Generating an SSL certificate in WHM
This tutorial will show you the steps for generating an SSL certificate in WHM
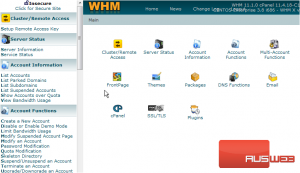
This demo assumes you’ve already logged in to WebHost Manager (WHM).
Now let’s learn how to generate and install an SSL certificate in WHM
1) Click the SSL/TLS link
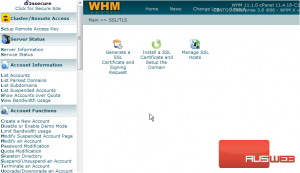
Getting your own domain-specific SSL certificate installed and working properly is a 3 step process. You have to: 1) Generate a request 2) Purchase a SSL certificate 3) Install the certificate
Let’s go ahead and walk through the procedure
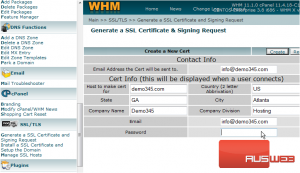
2) Click the Generate a SSL Certificate and Signing Request link
In this table we have to enter information about the domain name for which the certificate is for
3) Enter an email address where the certificate request information should be emailed
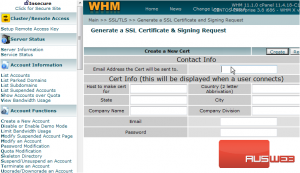
4) Then enter the domain name the certificate will be for

In this example, we want to be able to access demo345.com securely, like this: https://demo345.com, so we’ve entered demo345.com
The rest of the information in this form describes who the certificate is for, and will be displayed within the certificate
5) Let’s go ahead and complete the rest of the form
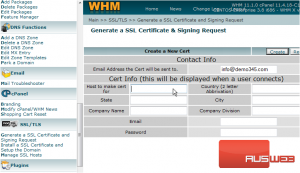
6) When finished, click the Create button
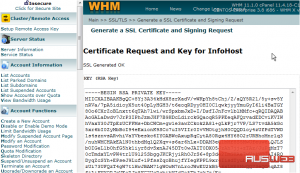
Step 1 is complete! We’ve just generated a Certificate Signing Request (CSR) and a Key, both of which are encrypted
7) The next step is to purchase a certificate, which we cannot show you how to do here. You have to go to an SSL certificate vendor to purchase the certificate, and they will require the Certificate Signing Request we just generated in step 1. Once you’ve successfully purchased the certificate (step 2), you must return here to install it (step 3, final step)
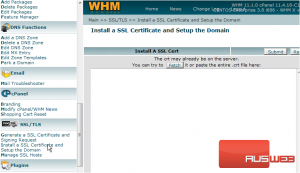
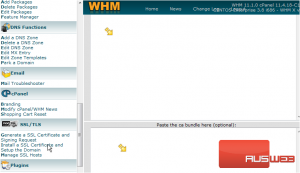
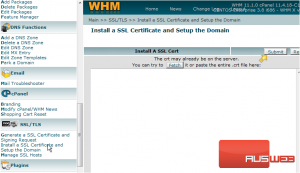
8) Click the Install a SSL Certificate and Setup the Domain link
This screen is where you install your newly purchased SSL certificate
The Domain, User and IP Address boxes may fill in automatically when you paste your certificate above, but if not, enter the domain this certificate is for here (in this case, demo345.com). The username for this domain goes here (in this case, demo345). The IP Address for the domain goes here (if you don’t know what it is, you can go to List Accounts in WHM to look it up)
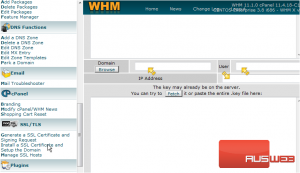
The Key that was generated with the certificate signing request in step 1, should be pasted in here. If required, the ca bundle should be copied and pasted in here. If you haven’t seen it or do not know what it is, leave this box blank
9) Next you would click this Submit button and the SSL certificate would successfully install
This is the end of the tutorial. You now know how to generate a SSL certificate signing request, and install the certificate in the server
